Creating users in different systems is a common task that in many cases can be quite challenging. It gets even more challenging having migrated email to Office 365, decommisioned the Exchange Servers, still keeping the local Active Directory. Using Directory Synchronization/Password sync, as of today, creating users in the correct way in your local Active Directory is not optional. By the correct way, I mean a user with proper UserPrincipalName, proxyAddresses, mail etc, which usually is where we get problems.
We do of course have lots of tools, like FIM/MIM and others to help us do this in an automated and predictable way. But if we don’t have that, what are the options?
In this post, I will give you an example on how to create a “poor mans solution” on this topic, using tools that you already have if using Office 365. SharePoint Online and PowerShell. If you have System Center Orchestrator in your environment, the integration with SharePoint Online can be handled by an integration pack instead.
OVERVIEW
Overview on that the post will cover:
Read list items from an already existing list in SharePoint Online.
Create an AD user in a predictable way based on input from SharePoint Online.
Send an email to the new users manager with the account information.
Report back status to SharePoint with status and username/email address to the SharePoint list item.
GETTING STARTED
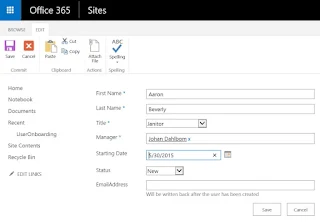
First of all, you need to create a SharePoint list with the columns that you want to use as input for your new users. In my example I have called the list “OnBoarding” and created the columns as below. The status column will in my case be extra important since I will use that to determine if the user has been created or not. (there are other ways to do that of course)
Next up is preparing our “automation server” with the right tools. We will use the Client Side Object Model (CSOM) in SharePoint to integrate with SharePoint Online. For that we need the SharePoint Server 2013 Client Components SDK, which can be downloaded from here. You also need to have the ActiveDirectory PowerShell module on the machine running the script.
CREATING THE USER / RUNNING THE SCRIPT
First of all, we need input data in the SharePoint list for the user to create
.
Then configure the script to fit your AD Settings, SPO credentials, addresses and the column name mappings in the $SPListItemColumns hashtable. Note that spaces will be replaced by ‘_x0020_’, so for example ‘Last Name’ will be ‘Last_x0020_Name’.
Apart from the above, the example script consists of the simple functions described below:
Convert-ToLatinCharacters – will get rid of all the non-unicode characters and some more creating the username. (Thanks to Johan Akerstrom)
Get-JDDNFromUPN – returns distinguishedname of a userprincipalname, to support adding a manager to the AD User.
New-JDSamAccountName – Generates a samaccountname for the user, based on firstname + lastname (default 3+3 characters). Will handle duplicates.
New-JDUPNAndMail – Generates a userprincipalname and emailaddress based on firstname.lastname. Will also handle duplicates but assumes that UPN and Email are the same in your environment.
New-JDADUser – Creates the AD user and returns sAMAccountName, UserPrincipalName and the Password. Password generated by the System.Web GeneratePassword method (there are of course other and better methods)
Send-JDWelcomeEmail – Basic function to send a “Welcome Email” to the manager with the account information. Lots of room for design improvement in the email sent out, but it works. The email will contain the users password in clear text, so be careful with the recipient.
CreateADUsersFromSPO.ps1
+ expand source
Having understood all the functions and settings, we are now ready to run the script!
The script executed successfully, which means we should now be able to add the script as a scheduled task to automate the task even further.
RESULTS
We now have a properly created AD user according to my organizations needs, and the manager has got an email with the account information needed. The only thing left now is waiting for the directory synchronization and licensing scripts to kick in, and the user will be all set
Created AD user
Updated SharePoint list item
Information email sent to manager
Hopefully this has given you some useful information regarding how you can create your simple self service tool with some help from things you already have. Let me know if you have any feedback
.png)


